Pages

Showing posts with label applique. Show all posts

Thursday, October 17, 2013

Win a Pattern!!

Now that all four of my Polka Dot Crossing quilts are complete and patterns available on Craftsy, I thought it would be grand to do a contest -- to win a free pattern.

Check out these four designs, which include:
Shoe Shop, Flower Shop, Barber Shop, and Fabric Shop


SHOE SHOP

FLOWER SHOP

BARBER SHOP

FABRIC SHOP


Contest closed.

.....

Wednesday, September 18, 2013

Flower Shop Pattern

Shop to Shop -- Series A consists of four themed quilts using polka dot fabrics for the inner border and binding. Colors used will be brown, green, red, and yellow. Each one will be embellished with a variety of buttons; and wording decorating the outer border.


You'll be able to decide whether you wish to use the wording provided in the pattern, or make changes such as: using different words or none at all. Or, you may wish to use appliques instead of buttons for some of the blocks.


The center section with the first border (polka dot fabric) is 15 3/8" wide x 12" high.  Add the white border and it will be approximately 22" wide x 18 1/2" high.

The second pattern: FLOWER SHOP is now available at my Craftsy store.
 
 
MORE ABOUT THIS PATTERN
 
Check out the following blog posts that journal this pattern's progress:


Check back in two weeks, for the next pattern in this series. Want to join in the fun and win a free pattern, this opportunity will be coming later this fall. More details coming in October.
 
.....


Wednesday, September 4, 2013

Shoe Shop Pattern

Shop to Shop -- Series A consists of four themed quilts using polka dot fabrics for the inner border and binding. Colors used will be brown, green, red, and yellow. Each one will be embellished with a variety of buttons; and wording decorating the outer border.


You'll be able to decide whether you wish to use the wording provided in the pattern, or make changes such as: using different words or none at all. Or, you may wish to use appliques instead of buttons for some of the blocks.
 
The center section with the first border (polka dot fabric) is 15 3/8" wide x 12" high.  Add the white border and it will be approximately 22" wide x 18 1/2" high.

The first pattern: SHOE SHOP is now available at my Craftsy store.
 
 
MORE ABOUT THIS PATTERN
 
Check out the following blog posts that journal this pattern's progress:


Check back in two weeks, for the next pattern in this series. Want to join in the fun and win a free pattern, this opportunity will be coming later this fall. More details coming in October.
 
.....


Saturday, August 31, 2013

Elza's Flowers

My final layout chosen, appliques fused in place, and zigzag stitching done; it was time to add the  lettering to the borders.

This time I tried all capital letters on the bottom border; however, I didn't think it fit or looked balanced. So, then I redid the letters I needed; and replaced most of them with lower case letters.
 

FIRST LAYOUT WITH CAPITAL LETTERS
 

CHANGING TO LOWER CASE LETTERS 
 
This change was to my liking. The last addition to make was adding some fancy buttons, once the quilt was finished.
To finish, all I needed to add was the backing, as I had added the batting to the top layer to stitch through both layers while adding the appliques. I found this worked quite well. I also like matching the binding fabric to something used in the quilt blocks; in this case, the inside border, as I wanted to use more of the polka dot fabric. 
 
Here is the finished quilt project. I am also working on a pattern, which I plan to add to my store in the coming month.  

FLOWER SHOP QUILT
 
There are two more quilts in this series that will be showcased in September and October. Hope you've enjoyed these projects, so far. 
As we once again turn another page on the calendar, into another season; hope your plans include a few exciting quilting projects. Cheers.
.....


Saturday, August 24, 2013

Basket of Flowers

To begin, I had chosen four vases to fit onto the blocks, and now I needed to add more images to fill the rest. Thinking of what a real flower shop displays and has for sale, I wanted to add lots of flowers.

Having drawn and prepared several applique pieces, I began to try them out. The first layout shows the vases placed on the green blocks and a few flowers lain out on the brown blocks.

VASES ON GREEN BLOCKS


One goal in mind was to have vases filled with stemmed flowers that were ready for creating flower arrangements. So, how to go about this….
With these tall, black vases, I tried several layouts; here are two of them. Even though I liked the idea, I just wasn’t impressed with using black. I found it too harsh. So, then what….

ADDED FLOWERS IN TALL VASES #1
 

ADDED FLOWERS IN TALL VASES #2


Having introduced baskets in the above layouts, I figured that was a nice addition to the vases. My next query; was how to arrange them properly.  
After a lot of adjusting and figuring out what to use for my stemmed flowers, I was ready for the final options.
This layout was working well, and after deciding that I’d place each group into rows, this is what I thought would work the best. Here’s a sneak peek at part of the final layout:

FINAL LAYOUT IN PROGRESS


Don’t get me wrong, every slight adjustment did look good; sometimes better and sometimes another great alternative. What I did need to do was make a final decision and fuse each block’s images in place. As at some point, we must move on to the next stage of the process. 
Check back next week, when I’ll show you the completed quilt.

…..


Saturday, August 17, 2013

Flowers and Vases

The theme for my second quilt in this series was: flowers. For a peek behind the scenes, here is how it began.

Having decided I would use the green polka dot fabric, I chose a green and a brown for the inner blocks, from my fabric stash. I would use the same measurements for the blocks and borders as for the shoes quilt. Those that needed resizing were cut into four-inch blocks. Some were already the size I required.
ADDING POLKA DOT BORDER
 
Applique selection began with choosing several styles of urns and vases; then figuring out what else to add before working on the arrangement of these twelve designs. Even though this can take much time, I enjoy this part of the process. Sometimes the hard part is trying to make the final decision on design placement. There are many options, and only one is needed.

QUILT TOP WITH SIX APPLQUES

 
The Block Appliques
On small blocks such as these, the best method to add the appliques is to first sew all the blocks together to make a larger surface area before applying the applique pieces.

Then, if you notice some designs extend beyond the borders of their own block and also onto the polka dot border. This requires the first border to be added before adding the appliques.

 
When to Add the Borders and Batting
Also when a piece has a lot of applique work added, it tends to shrink in some areas, this can make the borders harder to keep straight.

So this time, I thought I’d add the batting to the quilt top I’d created. I found this helped keep the piece straight. The one thing I found happening, was the batting tended to shed onto the quilt top. So after I had finished stitching on the appliques, I used masking tape to de-fuzz the quilt top.
Because I had only added the polka dot border, I still needed to add the white border before adding the backing fabric. This was not difficult to do. I just figured next time; I should just add both borders on this size quilt, if I wanted to add the batting piece, so it could be stitched through while doing the applique stitching.
ADDING WHITE BORDER

Check back next time -- to see some of the layouts that I tried in the process of figuring out what I liked best.

…..


Wednesday, July 31, 2013

Amalie's Footwear

My main objectives for this project were:
1.      To create a unique quilt using the polka dot fabric that I was saving for a special occasion.
2.      To try something different on the borders, by using lettering to fill up the white space. 

What to Add to the Quilt
First, I needed text and names to represent what the theme was portraying.
Since, I had just completed my family tree quilts; I was intrigued by the names that were found in the genealogy record. Therefore, I would choose names from the past that appealed to me and were not common names found today.

So what would I decide?
1.      I wanted to create a special place, and thus after much thought; named it “Polka Dot Crossing’.  This would go on the top border.

2.      I needed a catchy phrase. What relates better to shoes than a sale. So the text, “Shoe Sale” was added to the bottom border.

3.      And after having worked on this quilt, came up with the idea of creating more similar quilts with different themes. So decided the collection would be called, “Shop to Shop”.

4.      So I needed a name for the shoe shop. Finding the name “Amalie”, it was named, “Amalie’s Footwear”. And these words would go on the side borders.
 
Second, I wanted to add elements to the quilt to make it more than one-dimensional.
Here was the perfect opportunity to use decorative buttons that just waited to be discovered, in my button jars; and add uniqueness to the quilt design.  This allowed me to pour out my button jars and see what interesting shapes and sizes were hiding in plain sight.
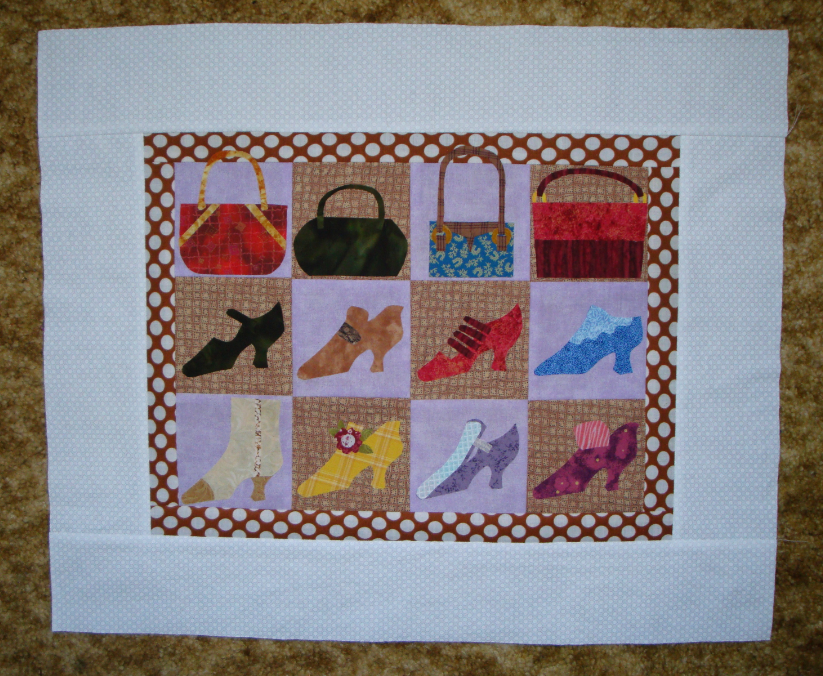
Here’s the finished quilt. It measures 21 3/4” wide by 18 1/2” high.

My Quilt
 

SPECIAL NOTE:
I really appreciate your visits and comments in this blog adventuring; and hope to see you join me again to read more about my creative interests and new projects. My plans involve adding several FREE pattern tutorials this year (mainly quilting) on the first Saturday of the month.

My first FREE project coming to this blog… August 3, 2013.

…..


Saturday, July 27, 2013

Shoe Sale

Creating this quilt was a real energy boost during some really intense hot summer days. Now that we have figured out how to cool the upstairs with the placement of four floor fans, it is much better.

Since then, I’ve completed the first two quilts in my Shop to Shop collection. My plan is to create a variety of quilts using all four polka dot fabric colors shown in an earlier post—brown, green, yellow, and red; and then producing a PDF pattern for each quilt design.

Here is how QUILT ONE has evolved so far:
My final placement of the appliques turned out like this: I liked the handbags on the top row and the shoes below. This reminded me of a real store display. 
APPLIQUE LAYOUT
 
 
Adding buttons was a fun process. I have two jars of buttons, and really wanted to have a project to play with them again. Even though they look so decorative displayed that way, at some point they SHOULD be used!! 

MY BUTTONS


Then when I finished the stitching, and added the layers to add the binding, I did go with my gut feeling of using the polka dot fabric. It adds a unique look, tying in the polka dot theme to this project.  
BINDING

 
Come back next time, to see the finished project.

.....


Saturday, July 13, 2013

Shoes and Handbags

Polka Dot Fabrics

Here are the four polka dot fabrics that I have in my stash that I will be using in my little quilts. They were originally my mother’s; and then given to me some years ago (five or six or maybe more). I haven’t really done much with them; as I really did want to save them for a special project.

[Brown, Green, Yellow, Red]


SHOES Quilt
Now that my little SHOES quilt is well underway, it’s time to give you a sneak peek at some of the construction process…
 
Quilt Top with Borders Added
To begin, I had to decide on the main fabric colors for the background.  This was accomplished with some purple precut blocks I had in my stash. They were leftover four-inch squares from a baby quilt I had made in 2003. As I was going to use the brown and white polka dot fabric. I chose brown to go with the purple blocks.
Then, not wanting a boring outside border (trying to be more creative here); I decided on using black and white -- black lettering on white fabric; my projected vision of it.  
 
 
Templates--Fusible Web Ready for Fabric

Using fusible web, the templates have been traced and are ready for fusing to the fabric. It seems to be a rather messy process when I get out my fabric scraps and contemplate on colors and fabric choices. However, once that is done, the fun begins!


Initial Layout of Appliques

After the appliques are ready for the blocks, it was time to figure out their placement. This can also be time consuming; however, it’s best to just begin and see what comes of it. This is where a ready-made design speeds the process because the designer has already worked through all this.
I did change the order from what is shown here; however, you’ll see it next time once the lettering is completed. And you can decide if it works for you!


Auditioning Paper Lettering

After I had all the fused elements stitched down; I was ready to audition font styles and sizes that would best fit on the white border. 


Stitching the Letters with Zigzag Stitch

Once that was decided upon, I was ready to stitch the letters on the borders. [I used a zigzag stitch (2.0/0.5) in colors closely matching the fabric pieces.]
In most cases, I’d only need to change the bobbin thread if the top thread was changed from a lighter color to a darker color or vice versa. This allowed me to use the same bobbin thread on many of the applique design pieces.


TO COME:
   1.  Adding the embellishments I have in mind.
   2.  Final decision on fabric for the binding.
   3.  Creating a PDF pattern of this quilt project.
 

…..